This document provides step-by-step instructions on how to perform specific tasks using the Arrayent Utility web application.
Accessing the Utility App
The Utility app is a web application. You interact with the app via your web browser. We recommend using Google Chrome or Mozilla Firefox.
Locating the Utility App
The Utility App is available at the following location in every Arrayent Cloud environment: https://SUBDOMAIN.arrayent.com:8081/Utility Where SUBDOMAIN is the subdomain of your Arrayent Cloud environment. Always use https, not http, and always send the request to port 8081 (:8081).
Logging In to the Utility App
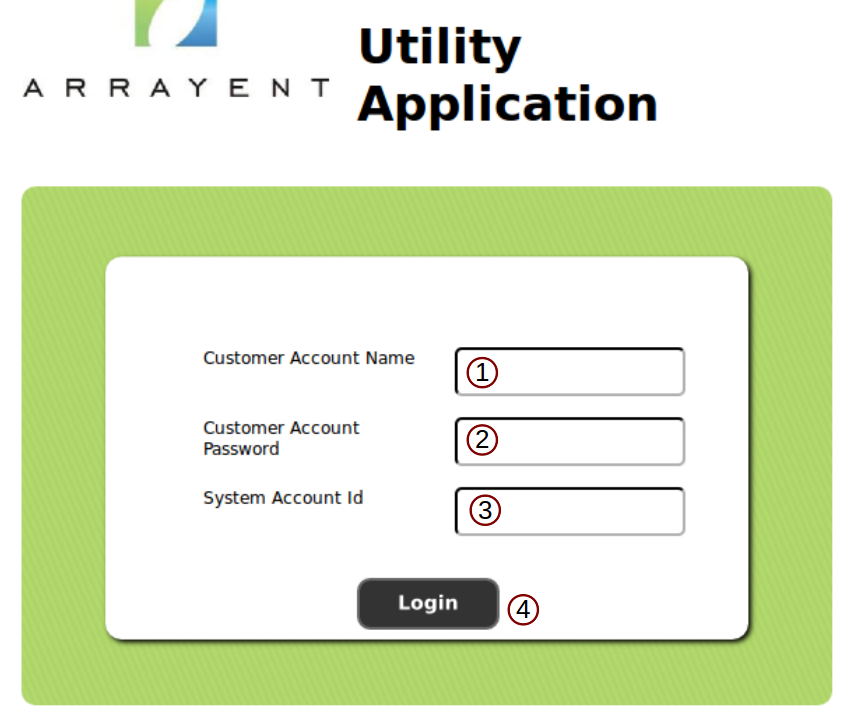
To log in to the Utility App:
- Enter your Customer Account username.
- Enter your Customer Account password.
- Enter your App ID. This is the App ID of the System Account that created this Customer Account.
- Click Login.
Devices Page
The Devices page of the Utility App enables you to add devices to and remove devices from your Customer Account.
Overview
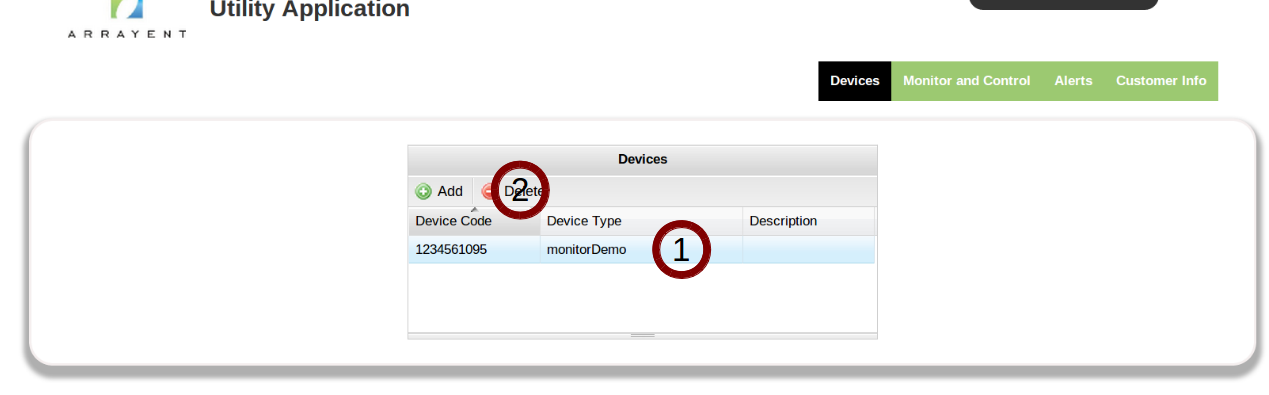
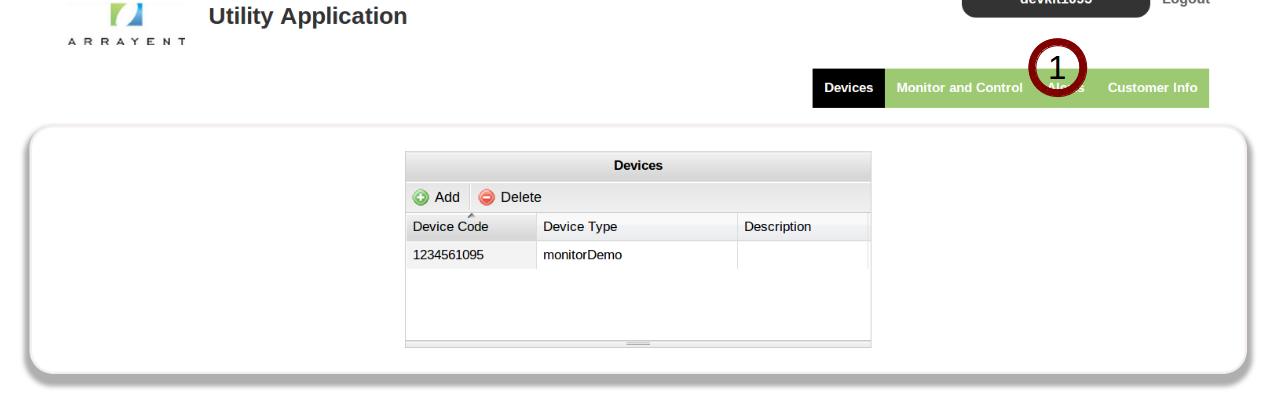
The Devices page contains the following components.
- The Add button enables you to add devices to your account.
- The Delete button enables you to remove devices from your account.
- The table lists out all devices which are currently owned by this Customer Account.
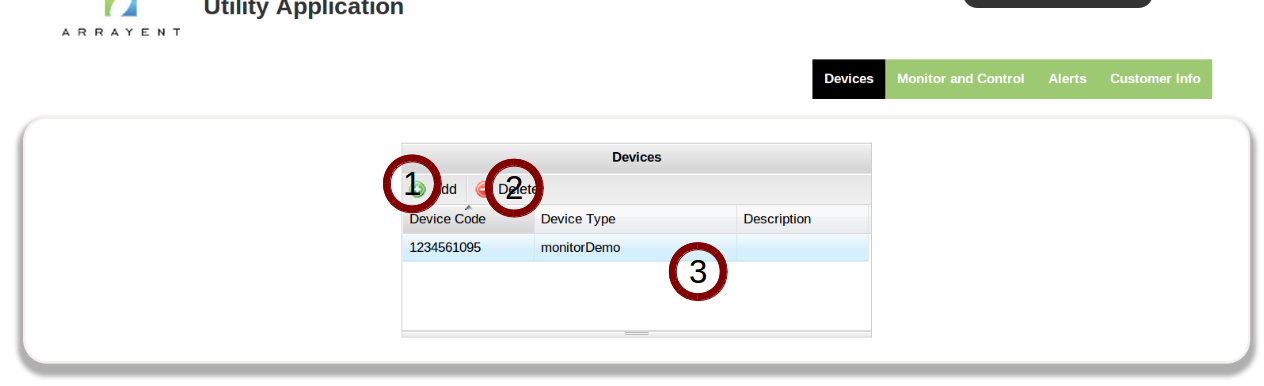 Note that the table will be blank if you have no devices associated to this account.
Adding a Device
The section below explains how to add a device to your Customer Account.
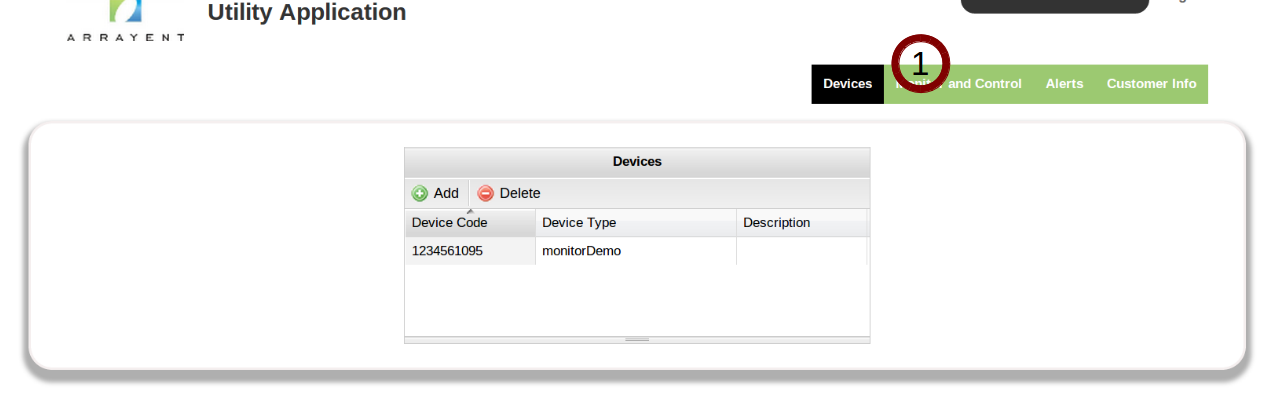
- Click the Devices tab.
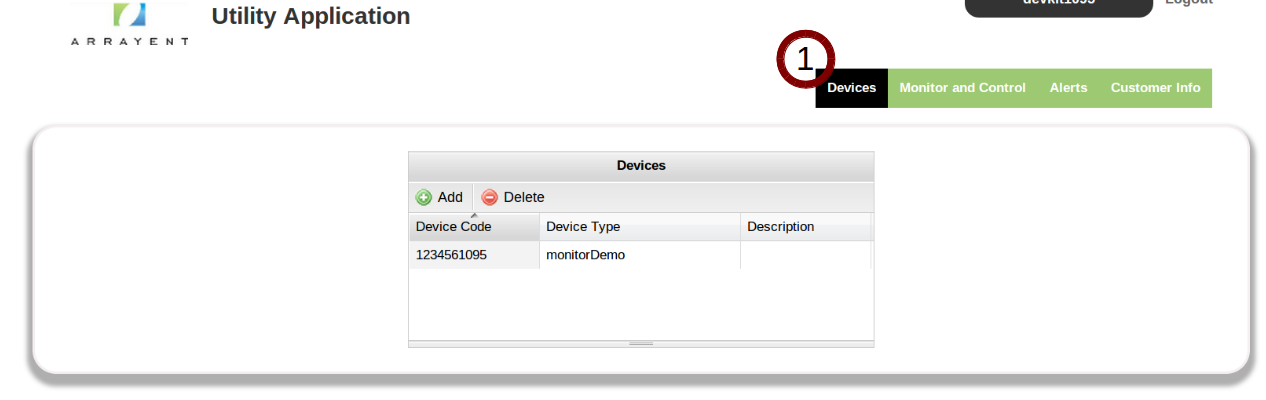
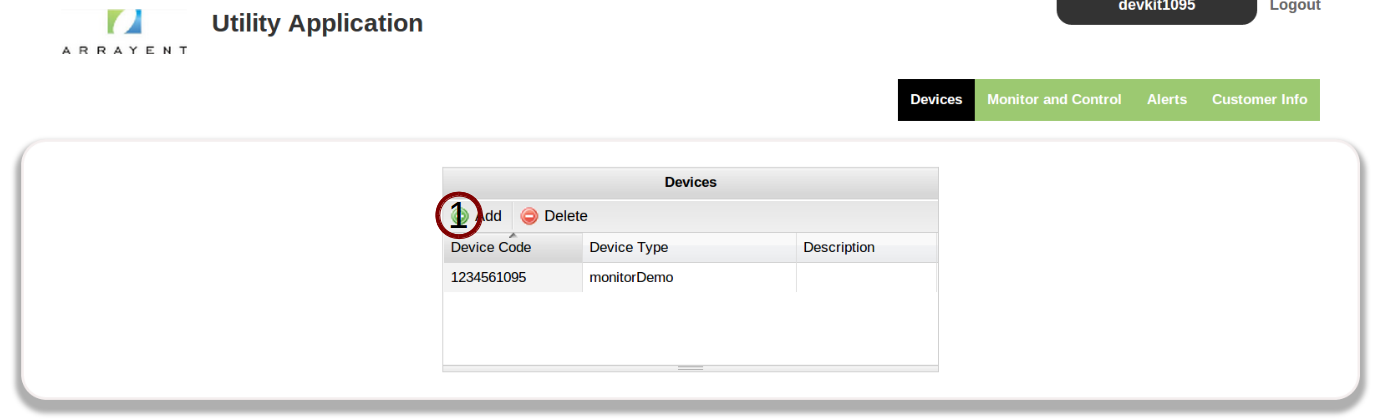
Once you are at the Devices page, complete the following procedure to add the device to your account:
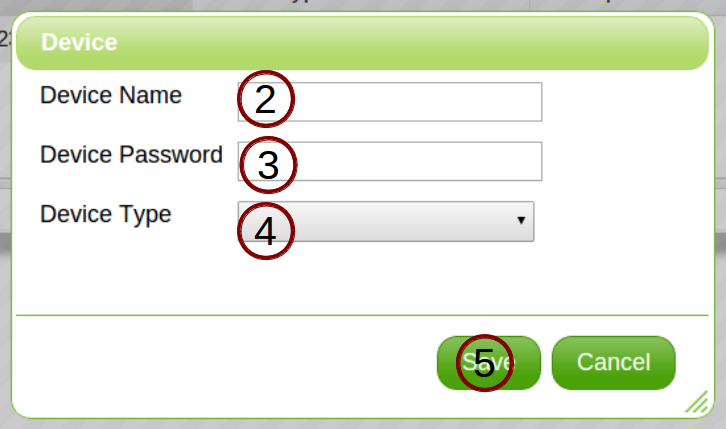
- Click the Add button.
- Enter the Device Name of your device.
- Enter the Device Password of your device.
- Select a Device Type for your device.
- Click the Save button.
If the device is successfully added to your account you will see the following message:  The following message means that another Customer Account already owns this device, and therefore you cannot add it to your own.
  The following message means that the Device Code you provided does not exist in the Arrayent Cloud database. You will need to contact Arrayent Support in order to get the Device Code registered in the Arrayent Cloud.
Deleting a Device
This section describes how to “delete” a device from a Customer Account using the Utility app. You must be logged in as the Customer Account that owns the device.
- Click the Devices tab to go to the Devices Page of the Utility Tool.
- Click the row containing the device which you want to delete. This will highlight the row.
- Click the Delete button.
- Click the Yes button to confirm the action.
Monitor and Control Page
The Monitor and Control page of the Utility App enables you to monitor and control individual devices. This section describes the various tasks that you can accomplish via the Monitor and Control page.
Montior and Control Page Overview
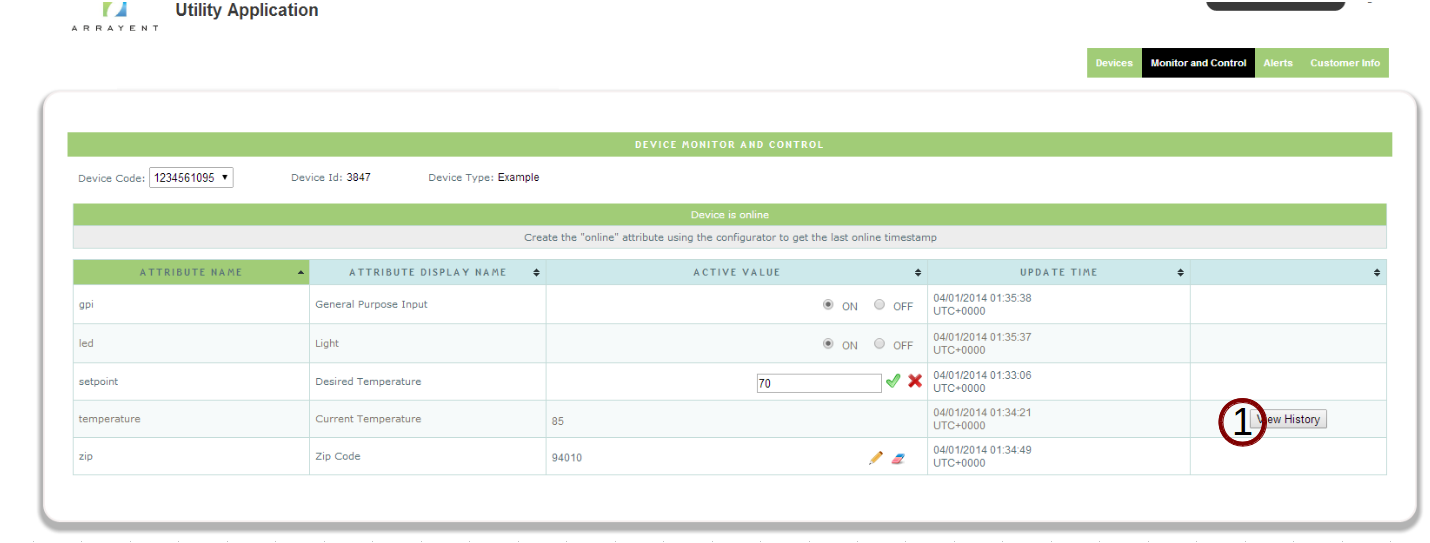
The screenshot and descriptions below summarize the main components of the Monitor and Control page. 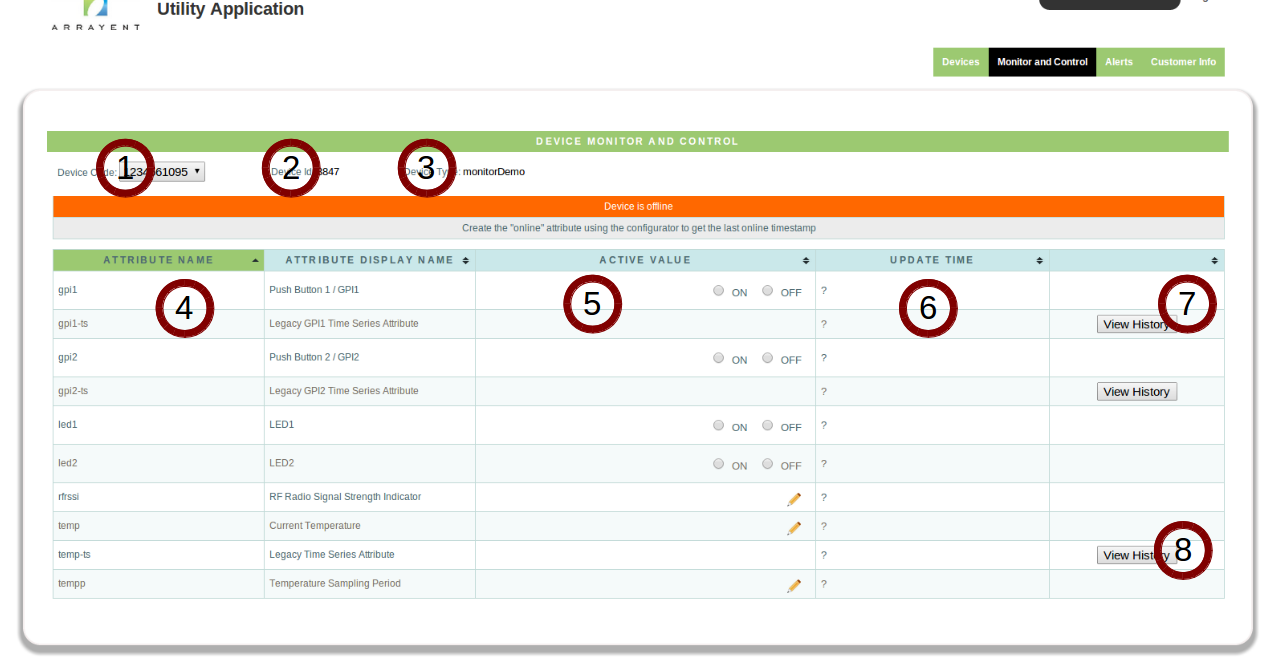
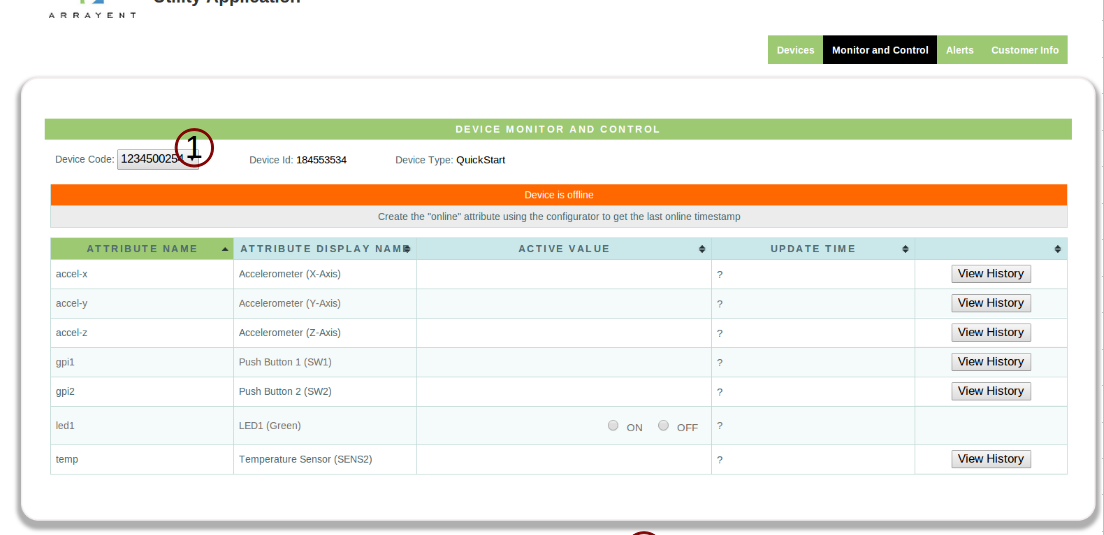
- The Device Code dropdown menu enables you to select which device you want to monitor and control. Once you select a device, the table of the Monitor and Control page updates to display that device’s information. All of the information that you see on the Monitor and Control page is the information for this particular device.
- The number next to the label Device ID is the Device ID of the currently displayed device. This is a random, unique integer that the Arrayent Cloud generates for the device.
- The text next to the label Device Type is the Device Type of the currently displayed device. This is the device data model.
- The Attribute Name of the column lists out the name of the device’s attributes. Each attribute gets a row.
- The Active Value column displays the current value of this attribute or operation.
- The Update Time column displays a timestamp indicating when this attribute was last updated.
- Attributes that have been defined as time-series attributes will have a View History button in the last column. If this column is empty, then the attribute has not been defined as a time series attribute.
- Clicking the View History button takes you to a separate view of the Monitor and Control page, which will enable you to view the history of the attribute either as a chart or a table. The View History button is only available for Device Attributes that have been defined as time-series.
Monitoring and Controlling Devices
Accessing the Monitor and Control Page
The Device Monitor and Control features of the Utility app are accessed via the Monitor and Control page. To access that page:
- Click the Monitor and Control tab to go to the Monitor and Control Page of the Utility Tool.
Selecting Devices
The Monitor and Control page of the Utlity app only enables you to monitor and control one device at a time. Follow the instructions below to learn how to switch between devices.
- Click the Device Code dropdown menu.The dropdown menu will display all devices currently owned by this user account.
- Select the device which you wish to monitor and control from the dropdown menu.
The Utility app will refresh the Monitor and Control page to display the device that you selected. After you select a device, all of the information that you see on the Monitor and Control page only applies to this particular device.
Monitoring Devices
When you define an attribute using the Configurator, you specify the direction of the attribute. Attributes that have been defined as “From Device”, meaning they are sent from the device to the cloud, will be displayed on the Utility app as read-only. The interval of these updates is determined by the host application of the device. Note that the Utility app refreshes every five seconds. If you have configured your device to transmit an attribute more than once every five seconds, you will not see the updates in real time (the device may be sending an update every second, but the Utility app only updates every five seconds).
Note
Although you specify attribute direction when defining an attribute (using the Configurator or the Arrayent Web Service API), the concept of “attribute direction” does not exist in the Arrayent Cloud. Once an attribute is defined, it can be sent in either direction. The user interface of the Utility app has been programmed to read the definition of an attribute and then dynamically update the Monitor and Control page to conform to that attribute’s usage. For example, “To Device” attributes are represented as editable buttons and text fields. “From Device” attributes are represented as read-only values.
Controlling Devices
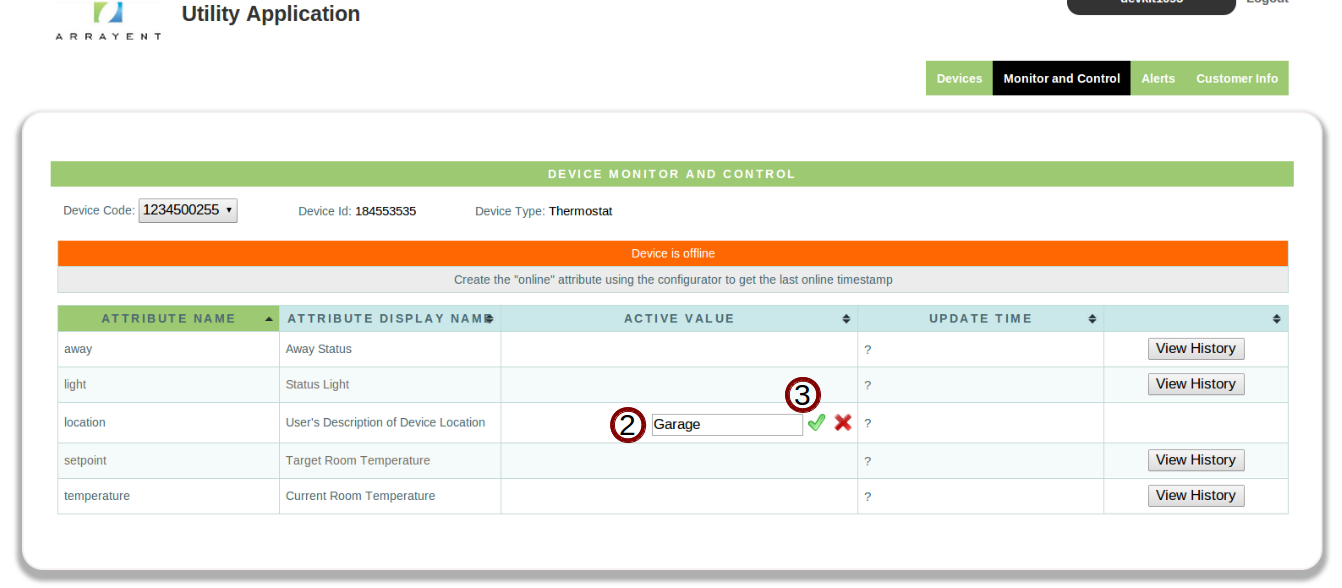
When you define an attribute using the Configurator, you specify the direction of the attribute. Attributes that have been defined as “To Device”, meaning they are sent from the device to the cloud, will be displayed on the Utility app as editable fields. Integer and string attributes are represented as text fields. Boolean attributes are represented as radio buttons. You use these text fields and radio buttons to update the values of your devices attributes. To change the values of integer and string attributes, follow the instructions below:
- Click the button that looks like a pencil.
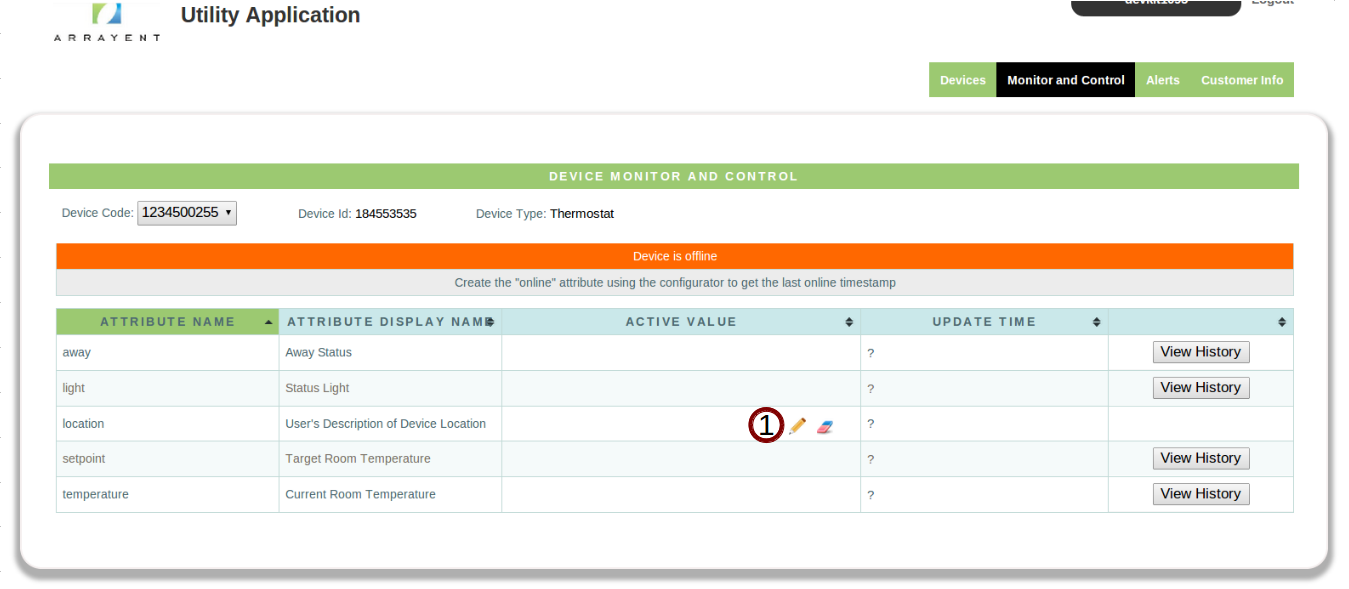
- Enter the new value in the text field.
- Click the button that looks like a checkmark.
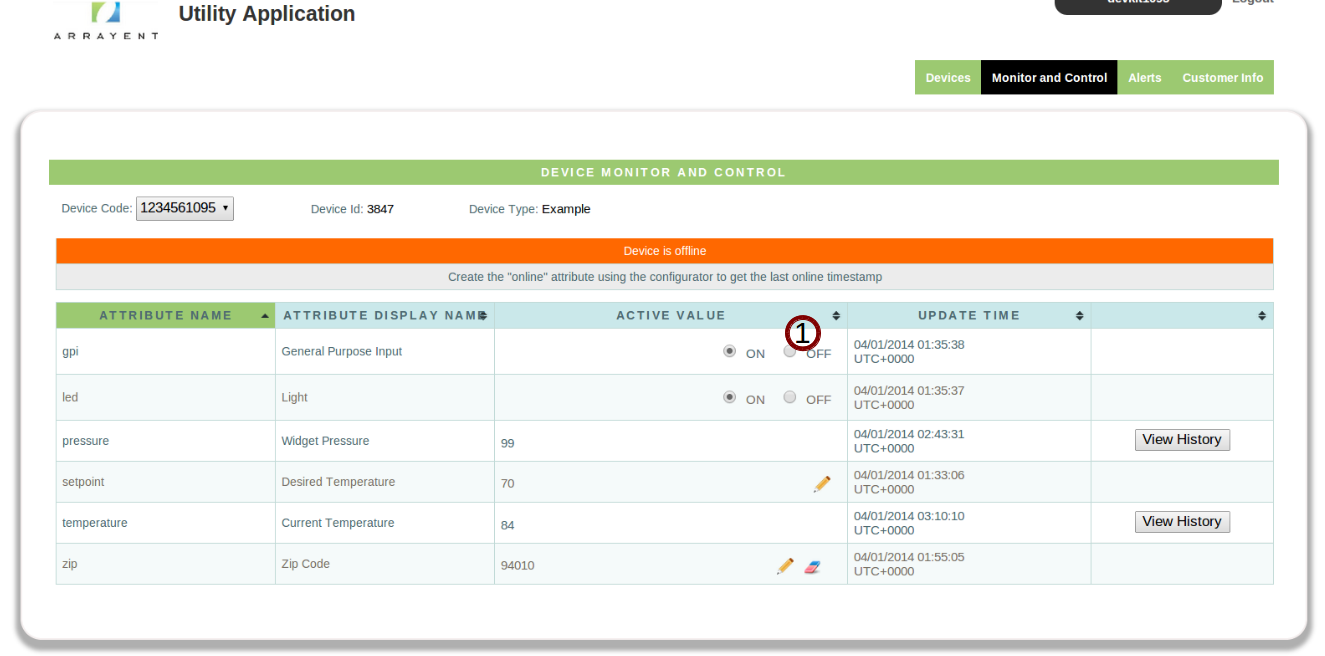
To change the value of boolean attributes, follow the instructions below:
- Click the radio button to change the value of the attribute.
Viewing Time Series Data
This section describes how to interact with time series data using the Utility app. The Time Series page of the Utility app is accessed via the Monitor and Control page. To access the Monitor and Control page:
- Click the Monitor and Control tab to go to the Monitor and Control Page of the Utility Tool.
The user interface that enables you to interact with Time Series data is called the “Time Series page” of the Utility App. Complete the following steps to access the Time Series page:
- In the last column of the Device Monitor and Control table, click the View History button next to the attribute that you want to view.
Note
If the attribute does not have the View History button, the attribute has not been defined as a Time Series attribute.
The Time Series page only displays one time series attribute of a single device at a time. You can see which attribute of which device is currently being displayed by looking at the Device section. 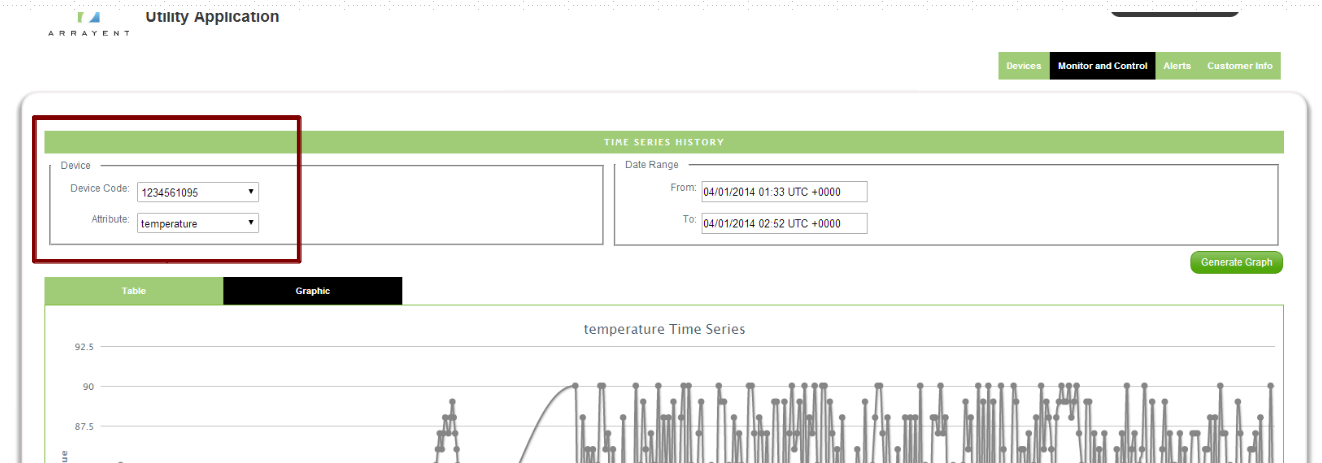 If you want to view the time series data for a particular time frame, follow the instructions below:
- In the section labelled Date Range click the text box next to From:. This text box enables you to select the beginning of the time range that will be displayed, down to the minute. See below for more information on using this interface.
- Click Done when you have finished setting up the starting point for the time range.
- Click on the text box next to To: and repeat steps one and two above. This text box enables you to select the end of the time range that will be displayed.
- Click Generate Graph when finished configuring the time range.
The screenshot and description below explain how to configure the time range: 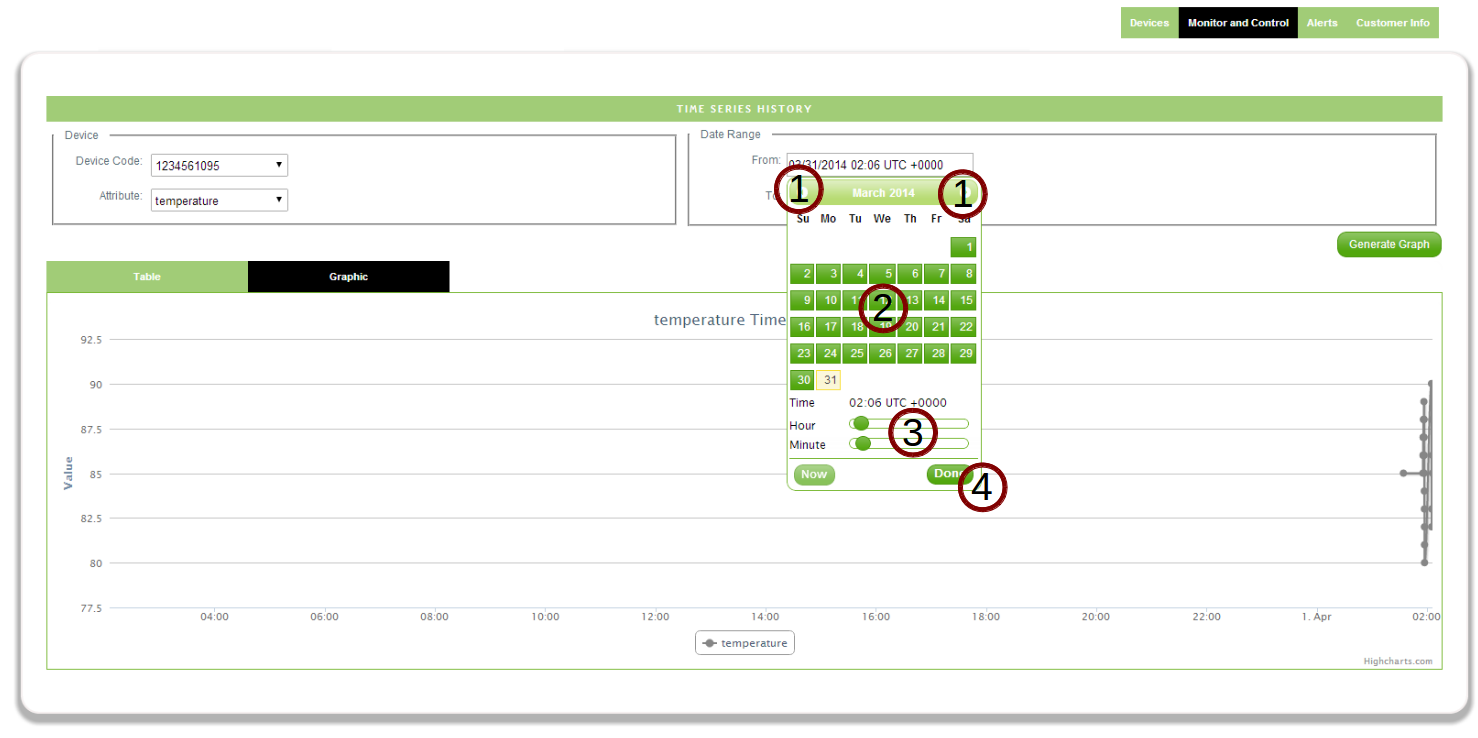
- The two caret symbols at top enable you to toggle between months. Click the left caret to go back in time a month. Click the right caret to go forward a month.
- The list of numbers represents the days for the currently displayed month. Click on one of these numbers to select a particular day.
- The two sliderbars enable you to select the hour and minute.
- Click Done when finished to store your changes. Remember that you still need to click Generate Graph after this in order to actually generate the time series data onto the Utility app.
You can also view the time series data as a table, rather than a graph. To view time series data as a table:
- Click the Table button.
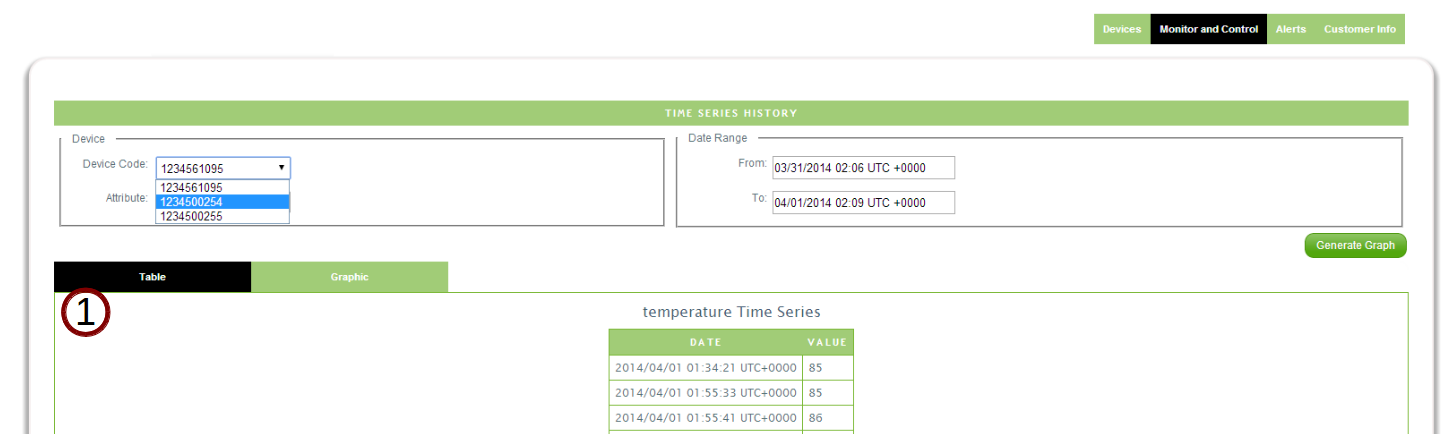 You can click Graph to return to the graphical view of the time series data.
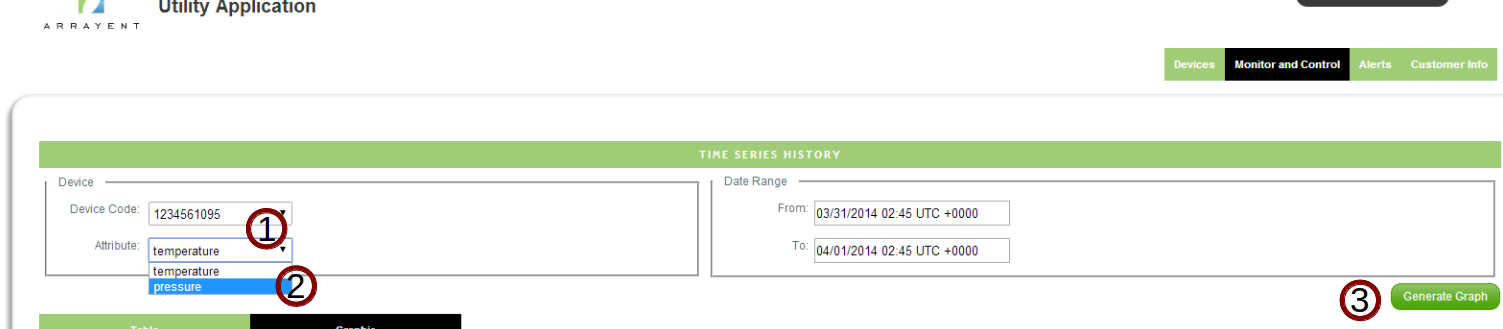
Selecting Devices and Attributes for Time Series Display
The Device section of the Time Series page enables you to view time series data for different devices, and for different time series attributes of a single device. To select a different device:
- Click the dropdown menu next to Device Code:.
- Select the device which you wish to view.
 The Utility app will automatically load the data for the first time series attribute that it finds. To select a different attribute of the currently displayed device:
- Click the dropdown menu next to Attribute:.
- Select the attribute which you wish to view.
- Click Generate Graph.
Alerts
The Alerts page of the Utility app enables you to create, modify, and delete alerts.
Creating Alerts
This section describes how to create alerts using the Utility app. The Create Alerts feature of the Utility app is located on the Alerts page. To access the Alerts page:
- Click the Alerts tab to go to the Alerts page of the Utility Tool.
Once you are at the Alerts page, complete the following procedure to create a new alert:
- Click the Add button.This will bring up the Create Alerts form.
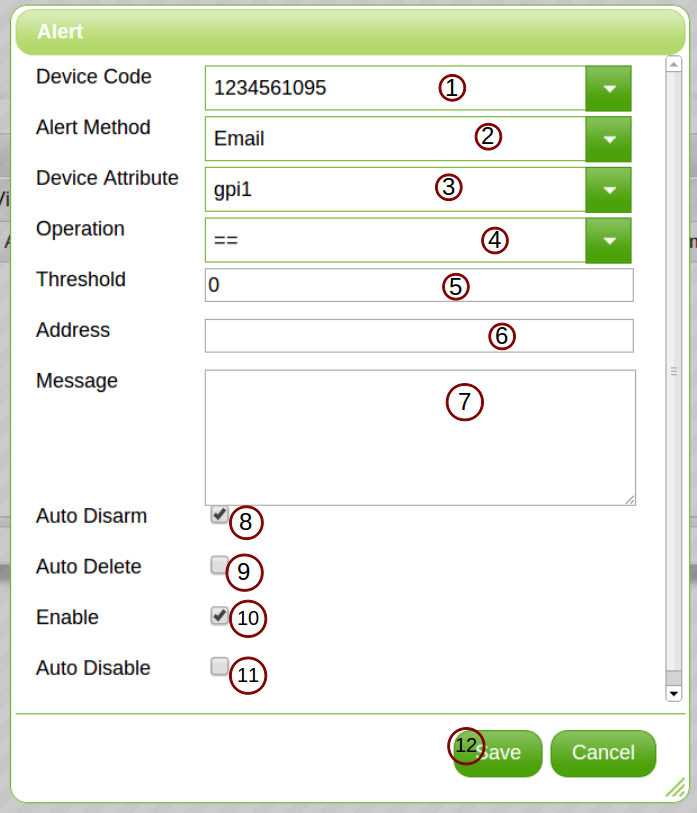
Repeat the procedure above every time that you want to create a new alert. The remainder of this section explains how to use the Create Alert form to configure your alert.
- Select the device which the alert applies to.
- Select the action which you want the Arrayent Cloud to execute when the alert is triggered.Note that the user interface of the form will change if you specify Mobile Notification or Attribute as your action. These are discussed in the sections below.
- Select the attribute of the device which the alert applies to.
- Select the comparison operator which you want the Arrayent Cloud to use when it compares the attribute value against the threshold value.
- Enter the threshold value.
- If you are creating an HTML Email or Email alert, enter the email address which will receive the notification. If you are creating a SMS alert, enter the phone number which will receive the notification. Leave the Address field blank if you are creating a Mobile Notification alert or Attribute alert.The format for phone numbers is a plus sign character (‘+’), followed by the country code, followed by the phone number. E.g. “+16503334444” (omit the quotes).
- If you are creating an HTML Email, Email, or SMS alert, enter the message which you want to send to the recipient of the notification. Leave this blank if you are creating an Attribute alert.
- Select the checkbox to enable Auto Disarm. Deselect the checkbox to disable Auto Disarm.
- Select the checkbox to enable Auto-Delete. Deselect the checkbox to disable Auto Delete.
- Select the checkbox to enable the alert. Deselect the checkbox to disable the alert.
- Select the checkbox to enable the Auto-Disable feature. Deselect the checkbox to disable the Auto Disable feature.
- If you are creating a push notification alert or attribute alert, see the instructions below before completing this last step.Click Save.
Creating Push Notification Alerts
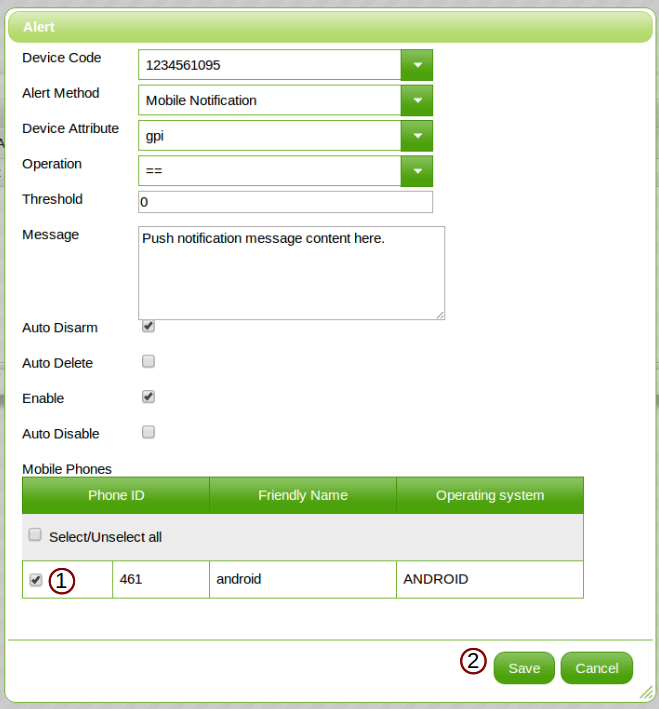
When creating a Push Notification alert, the user interface of the form will change to enable you to select which mobile devices will receive the push notification.
Warning
Note that there is a lot of setup work that you need to do before push notifications will work. See the Push Notification Alerts Guidefor more information.
- Select the checkbox to send out the push notification to this mobile device whenever the alert is triggered. You can send out the push notification to more than one device.
- Click Save when finished.
Creating Attribute Alerts
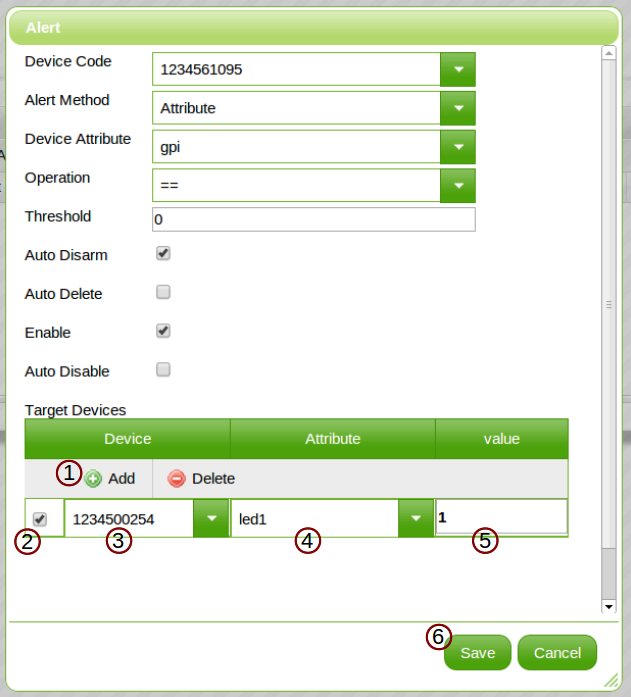
When creating an Attribute alert, the user interface of the form will change to enable you to select which attribute updates will be sent to which devices.
- Click Add for each attribute update that you want the Arrayent Cloud to send. For example, if you want to set an attribute called “led1” to “1” and another attribute called “siren” to “1”, then you would click Add two times.
- Select the checkbox. When the alert is triggered, the Arrayent Cloud will send the attribute update defined in this row. If the checkbox is deselected, the attribute update definition in this row will be disabled.
- Click on the dropdown menu to select which device will receive the attribute update.
- Click on the dropdown menu to select the name of the attribute that will be sent.
- Click on the dropdown menu to select the value of the attribute that will be sent.
- Click Save when finished.
Note
For attribute values requiring non alphanumeric characters in strings use double quotes around the string, e.g. “101.22.304.87”.
Creating Alerts for String Attributes
Newer versions of the Arrayent Cloud support two new alert operators, “regex” and “equals”. These operators enable you to create alerts on attributes that have been defined as strings.
Using the “equals” Operator
The “equals” operator enables you to create an alert that is triggered when the value of the device attribute exactly matches the threshold value. For example, suppose that you had implemented an attribute in your device called error. This attribute uses a complex string of characters and numbers to signify various error states. You could use the equals operator to define an alert that is triggered when the value of error is exactly BP93. 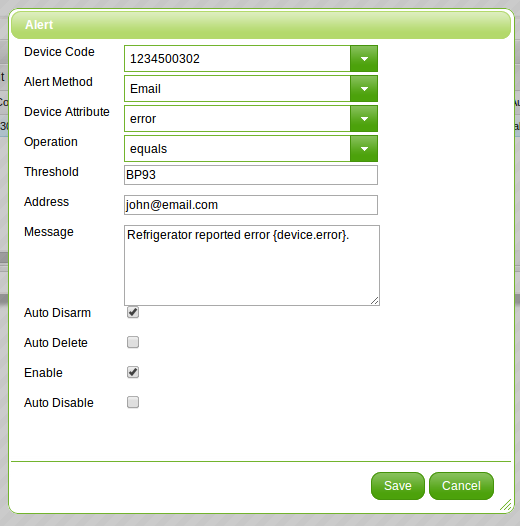
Using the regex Operator
The regex operator enables you to create an alert that is triggered when the value of the device attribute matches a regular expression pattern. For example, suppose that you had implemented an attribute in your device called “error”. This attribute uses a complex string of characters and numbers to signify various error states. You could use the “regex” operator to define an alert that is triggered whenever the value of “error” begins with a “7”, “8”, or “9”. 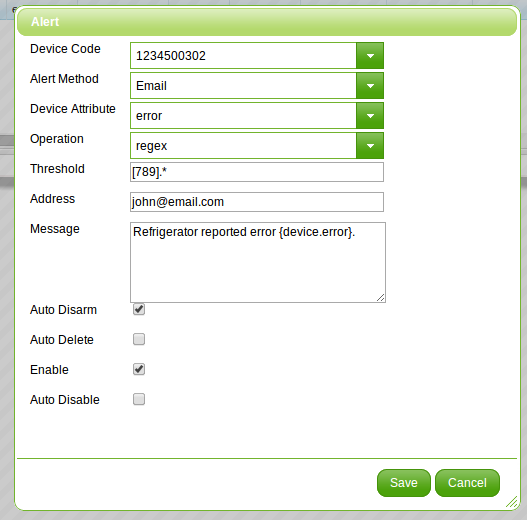 The regular expression syntax follows Java’s usage.
Editing Alerts
This section explains how to edit an alert using the Utility app. The Edit Alerts feature of the Utility app is located on the Alerts page. To access the Alerts page:
- Click the Alerts tab to go to the Alerts page of the Utility Tool.
Once you are at the Alerts page, complete the following procedure to edit the alert:
- Click on the row containing the alert you wish to edit. This will highlight the row.
- Click the Edit button.
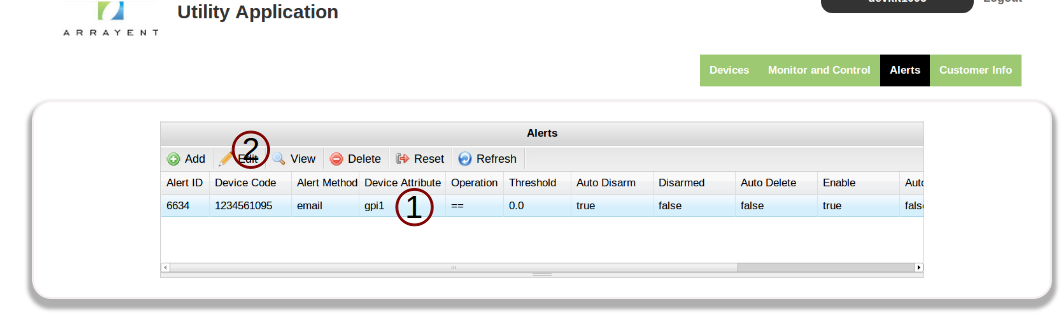
- Edit the alert as needed.
- Click Save when finished.
Deleting Alerts
This section explains how to delete an alert using the Utility app. The Delete Alert feature of the Utility app is located on the Alerts page. To access the Alerts page:
- Click the Alerts tab to go to the Alerts page of the Utility Tool.
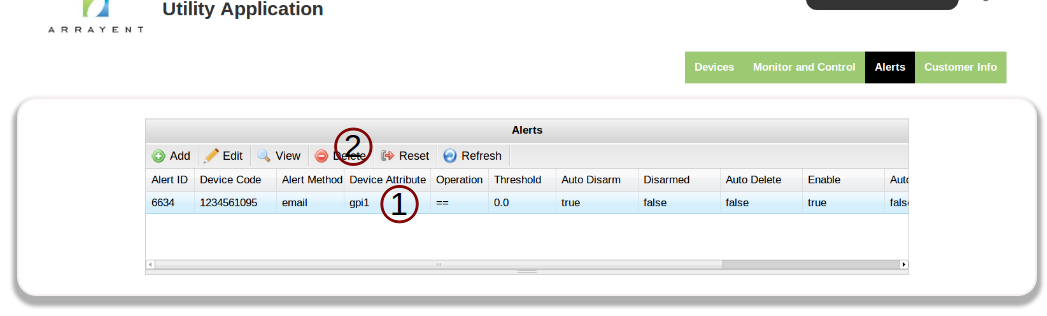
Once you are at the Alerts page, complete the following procedure to delete an alert:
- Click the row containing the alert you wish to delete. This will highlight the row.
- Click the Delete button.
Resetting Alerts
The Reset button of the Utility app enables you to bypass the Auto Disarm functionality of the Arrayent Cloud and manually “re-arm” an alert. The Reset Alert feature of the Utility app is located on the Alerts page. To access the Alerts page:
- Click the Alerts tab to go to the Alerts page of the Utility Tool.
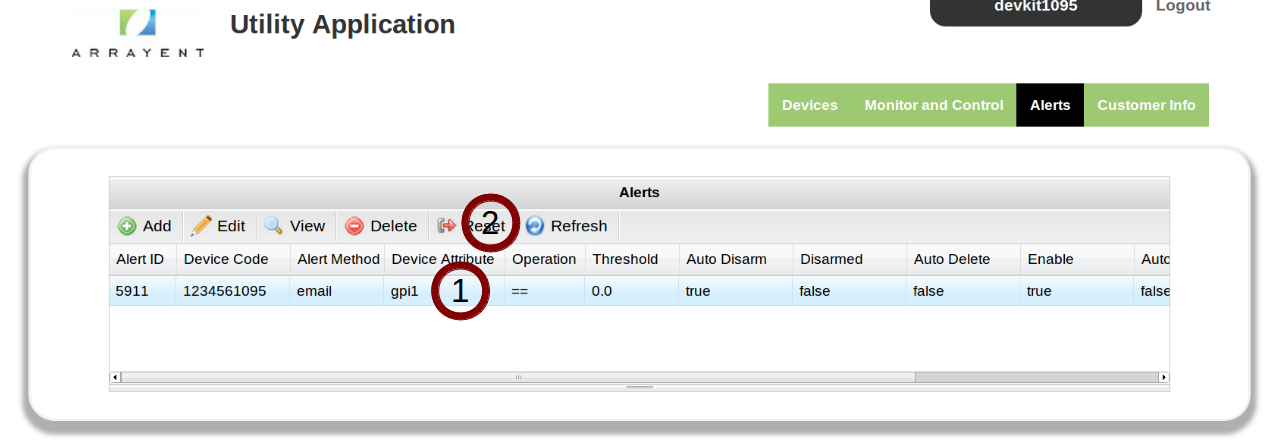
You can view the armed status of an alert by looking at the “Disarmed” column of the table that contains all the alerts that you have defined. Complete the following procedure to reset an alert:
- Click the row containing the alert you wish to reset. This will highlight the row.
- Click the Reset button.
Creating Scheduled Alerts
Customer Info
The Customer Info page of the Utility app enables you to view and modify your user account information.
Changing a Username
This section describes how to change a user account username using the Utility app. The Change Username feature of the Utility app is located on the Customer Info page. To access that page:
- Click the Customer Info tab to go to the Customer Info page of the Utility Tool.

Once you are at the Customer Info page, complete the following procedure to change your user account username:
- Enter your new username in the textbox next to Customer Account Name.
- Click Save.
 After you change your username, you will be logged out of the Utility app.
Note
In your Customer Account data model there is a special attribute called customerName. This attribute is generated by the Arrayent Cloud. It cannot be deleted and its name cannot be changed. This attribute stores the username of the Customer Account. To change a Customer Account username, the Utility app uses the web service operation setUserAttribute and sets the value ofcustomerName to the value that you provide in the text field of the Change Customer Account Name form.
Changing a Password
This section describes how to change a user account password using the Utility app. Note that you can only change the password of the account which you are currently logged in to the Utility app as. The change password form is located on the Customer Info page of the Utility app. To access that page:
- Click the Customer Info tab to go to the Customer Info page of the Utility Tool.
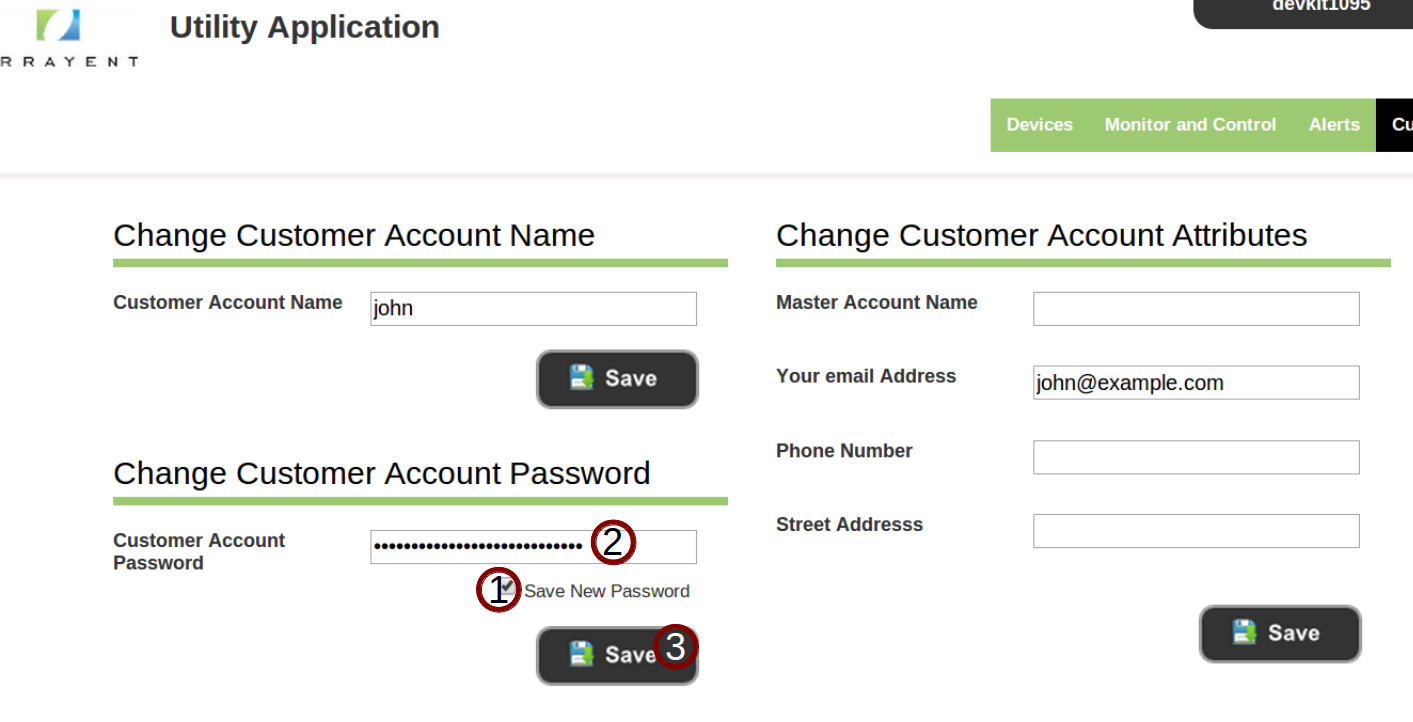
Once you are at the Customer Info page, complete the following procedure to change your user account password:
- Click the checkbox next to Save New Password.
- Enter your new password in the textbox next to Customer Account Password.
- Click Save.
 Once you change the password for the user account, you will be logged out of the Utility app. The next time that you login to the Utility app as this user account, the Arrayent Cloud will expect the new password.
Note
In your Customer Account data model there is a special attribute called customerPassword. This attribute is generated by the Arrayent Cloud. It cannot be deleted and its name cannot be changed. This attribute stores the password of the Customer Account. To change a Customer Account password, the Utility app uses the web service operation setUserAttribute and sets the value ofcustomerPassword to the value that you provide in the text field of the Change Customer Account Password form.
Changing User Attributes
This section describes how to change the current value of your user attributes using the Utility app. The Change User Attributes feature of the Utility app is located on the Customer Info page. To access that page:
- Click the Customer Info tab to go to the Customer Info page of the Utility Tool.
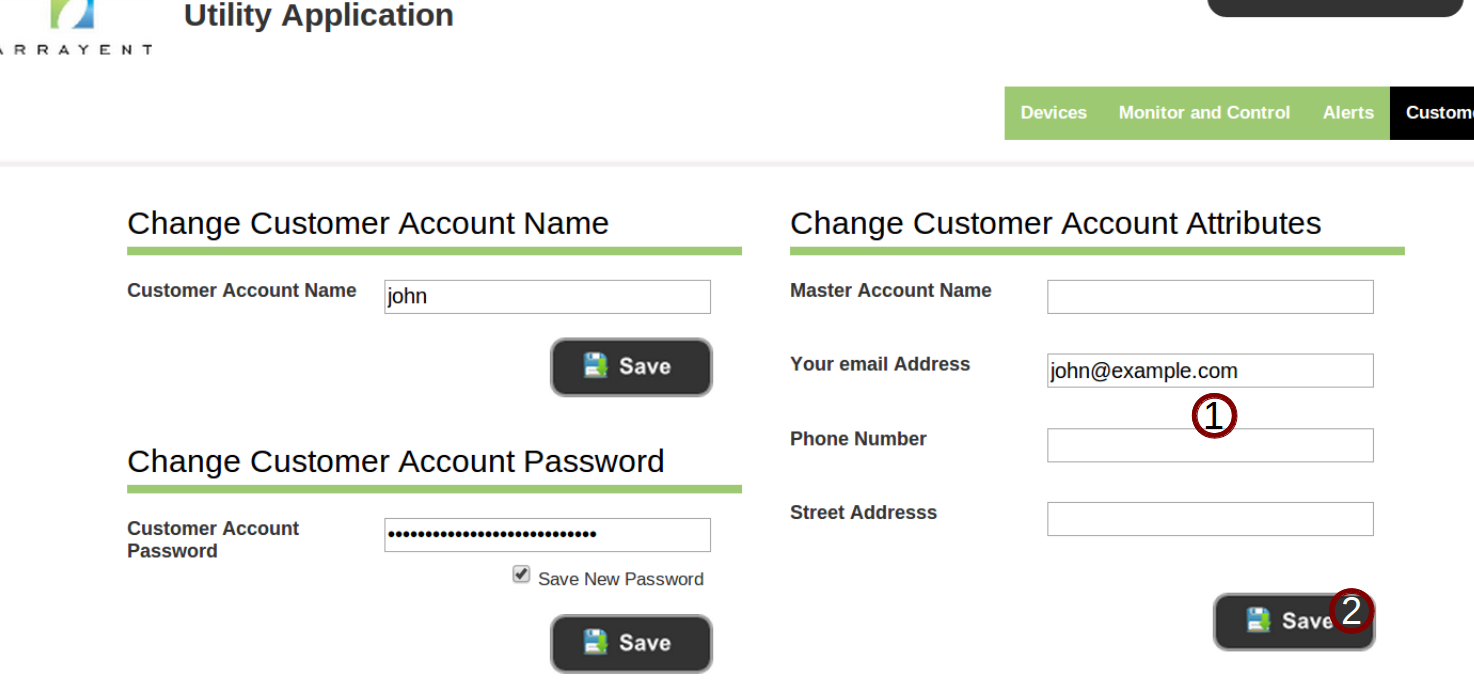
On the right side of the Customer Info page you will see a form with the title Change Customer Account Attributes. Complete the following procedure to change the current value of each of these user attributes:
- Edit your user attributes as needed.
- Click Save.
HTMLTidy.Net and html-cleaner.com are the best online markup cleanup tools and they are both free!