Introduction
Web Service Basics
This section contains a quick reference on the basics of constructing web service requests.
Base URL
All API access is sent over HTTPS, at port 8081. The base URL for accessing the web service follows this general format: https://EXAMPLE.arrayent.com:8081/zdk/services/zamapi/ Replace EXAMPLE to match the cloud environment that Arrayent has assigned to you.
Constructing Requests
To construct a web service request, you take the base URL of the Arrayent web service and append a web service operation name plus any required parameters of that operation. Take the following example: https://example.arrayent.com:8081/zdk/services/zamapi/login?username=john&password=03mx86ma
https://example.arrayent.com:8081/zdk/services/zamapi/is the base URL to the web service, as explained in the previous section.loginis the name of the web service operation to perform.- The question mark character (
?) afterloginis a delimiter between the operation name and the parameters. - Each parameter is structured as a key-value pair in the form of
key=value. In the example the first parameter isusername=john. The second parameter ispassword=90893045890fg254540923486ad. - The ampersand character (
&) is a delimiter between the two key-value pairs.
Encoding
All all special characters must be encoded for HTTP.
HTTP Method Support (POST, GET, etc.)
The GET and POST methods are supported for all web service operations. All other HTTP methods are not supported.
Customer Account Passwords
- Arrayent recommends cryptographically hashing all passwords.
- Maximum supported password length: 60 characters.
- Supported characters for usernames and passwords include letters, numbers, and special characters.
User Account Management
This section contains guides related to managing user accounts, including both Customer Accounts and System Accounts.
Registering Customer Accounts
There are two workflows to register Customer Accounts. By “register” we mean create a new Customer Account. We will call the first workflow the “self registration workflow”. We will call the second workflow the “System Account registration workflow”. The self registration workflow enables your application to securely create a new Customer Account directly from a client device, such as a smartphone. This is the preferred registration workflow for all applications. With the System Account registration workflow, you use your System Account to create the Customer Account from your secure server. This is the original account registration workflow.
Self-Registration Workflow
The self registration workflow enables you to create Customer Accounts directly from a client device, such as a smartphone. The diagram below summarizes the workflow. 
- Your application presents a registration form to the user. This must include a field for an email address, a username, and a password.
- The user enters an email address, username, and password into the form.
- Your application calls
registerUser, passing the user’s email, username, and password as arguments. You will also need to pass your Application ID as an argument to this operation. - The Arrayent Cloud automatically sends an email to the specified email address. This email contains an account activation code.You can modify the email template with
addEmailTemplateand setting thenotificationStageparameter toSELF_REGISTER. - The user must retrieve the activation code from the email message and provide this activation code back to your application. The activation code expires after one hour.
- Your application calls
activateUser, providing the activiation code as an argument. - The Arrayent Cloud automatically sends a Welcome email to the user’s email address.You can modify the email template with
addEmailTemplateand setting thenotificationStageparameter toWELCOME.
System Account Registration Workflow
The first time that an end user registers to use your web or smartphone application, the end user will need to register to create a new account. In reality, your web application will be creating a Customer Account in the Arrayent Cloud on behalf of that user. This section explains how to handle that process. When the end user selects to create a new user account, your application should take the user to a registration form. At the minimum, that form must prompt the user for a username and a password. Arrayent recommends using the user’s email address for the username. It is a best practice to encrypt the user’s password before sending the web service request to the Arrayent Cloud. To create a new Customer Account for this end user, your application uses the web service operation called createNewUser. To usecreateNewUser you will need to be logged in as a System Account. The example web service request below demonstrates how your application would take the user input entered into the registration form and convert it into a createNewUser request.
https://example.arrayent.com:8081/zdk/services/zamapi/createNewUser?
sysSecToken=11d4ddc357e08229&name=john@example.com&password=10xm5ldb
Note that the user’s password is being cryptographically hashed in the example above. Since this web service request contains sensitive user information, you may prefer to POST the request. If the Arrayent Cloud completes the operation successfully, the cloud will return a User ID in the response to the web service request.
<ns1:createNewUserResponse xmlns:ns1="http://arrayent.com/zamapi/">
 <userId>3759</userId>
</ns1:createNewUserResponse>
Starting Sessions
You should think of your application as the interface between the end user and the Arrayent Cloud. When a user wishes to log in to your application to monitor and control his devices, your application presents a login form. The user enters the username and password that he provided when he initially registered to create the user account. Your application will take the user’s input and construct a userLogin web service request, like the example below.
https://example.arrayent.com:8081/zdk/services/zamapi/userLogin?
name=john@example.com&password=1mx95mdl&appId=1000
Here your application is requesting to start a new user session. The Arrayent Cloud will take the provided username, password, and App ID and check its database records to see if that user exists. This username and password must match the values that were previously provided for createNewUser, when your application created the user account in the Arrayent Cloud. If the credentials match the cloud’s database record, then the cloud knows the log in request is valid and will then return a security token. The response will look similar to the example below. Note that the user’s password is hashed. This hash must match whatever hash was used when the user account was created. And since this web service request contains sensitive user information, you may prefer to send the request as an HTTP POST.
<ns1:userLoginResponse xmlns:ns1="http://arrayent.com/zamapi/">
 <userId>42</userId>
 <securityToken>897345hjaf234ggagdse25345</securityToken>
</ns1:userLoginResponse>
The security token serves as proof that the application is authenticated to make the request, and it also serves to identify exactly which user is making the request, since the token is unique to that user. For all subsequent web service requests that your web application makes on behalf of this user, your application will provide the token as a parameter to each request. The security token will remain valid for 15 minutes. After 15 minutes of inactivity the token will expire. Every time that a new request is made, the token is renewed for another 15 minutes.
Device Management
This section contains guides related to managing devices.
Online Status
This section discusses the various ways that you can determine the online status of a device. In short, the web service operationgetDevicePresenceInfo should be used to determine the connection status of a device at the present moment, whereas the “online” attribute should be used for creating alerts that are triggered when the online status of a device changes.
getDevicePresenceInfo
To determine the current connection status of a device, use the web service operation getDevicePresenceInfo. Note that the device must be added to a user account before you will be able to query the device via getDevicePresenceInfo. Do not rely on attributes, such as the “online” attribute discussed below, for determining the current status of a device.
“online” Attribute
When you need to create an alert that is triggered when a device goes offline/online, use the System Attribute called online. You can add this attribute to any Device Type. Using the Configurator the attribute should be defined exactly as is shown in the following screenshot.
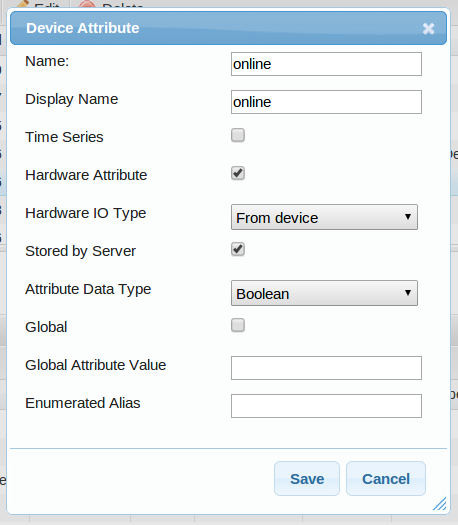 The attribute is a boolean data type. A value of 0 means that the device is offline. A value of 1 means that the device is online.
The “online” attribute actually represents the Arrayent Cloud’s online status for the device. Here’s how it is designed. Every device in the Arrayent Connect Platform periodically sends “heartbeats”, which notify the Cloud that the device is still connected. If a device misses a couple of heartbeats, then the cloud assumes that the device is offline and therefore changes the value of “online” to “0”. Note that because of this design, there is usually a delay of a couple of minutes between the loss of connection event in the device and the status of the “online” attribute. In other words, if you unplug your device, it will take a couple of minutes for the value of “online” to change to “0”. Also note that after a device is initially added to a user account, the value of “online” will be null.
Using the Utility application, you can create alerts that are triggered when this value is set to “0” or “1”, just like any other attribute. The screenshot below is an example of an alert that is triggered when the value of “online” is updated to “0”.

The free onlinediv table generator allows you to create nice grids for your websites. Please subsribe for a htmlg membership to stop adding promotional messages to the edited documents.